


In one of the previous articles on AI solutions, the creation of a convolutional neural network for Determining the degree of diabetic retinopathy was shown. This article will show you how to deploy an ML model as API.
Introduction
Machine learning (ML) has become a cornerstone for building intelligent applications in today’s data-driven world. However, the true power of ML models is realized when they are deployed as services that can be accessed and utilized by other applications or users. This is where creating an ML solution as an API and deploying it in the cloud comes into play.
This article will guide you through transforming your ML model into a robust API service and deploying it on a cloud platform. By leveraging cloud infrastructure, you can ensure scalability, reliability, and accessibility for your ML service, making it available to a broader audience.
Wrapping a machine learning model in an API and deploying it in the cloud enables organizations to leverage the power of advanced analytics without the complexities of managing infrastructure. This approach not only enhances accessibility but also streamlines the process of creating a cloud machine learning API that can serve predictions in real-time.
As we explore this topic, we will delve into the benefits and steps involved in creating a machine learning cloud API, making it easier for developers to harness the full potential of their models in a scalable and efficient manner.
Prerequisites
In this article, the choice fell on the following technology stack – FastAPI, Uvicorn, and Google Cloud Platform (GCP). First of all, due to ease of use. For example, below is the ASGI server startup code:
uvicorn app:app --host 127.0.0.1 --port 8080
Google Cloud Platform (GCP) was chosen due to its leading position in the market, a large number of manuals, as well as the ease of building docker images and their subsequent deployment using the convenient Google Cloud Run tool.
What is FastAPI and its benefits for building cloud machine learning APIs?
FastAPI is specifically designed for creating machine learning cloud APIs quickly and efficiently. It allows you to define endpoints, handle requests, and return responses with minimal code. Key Purposes of FastAPI:
High Performance:
- FastAPI ranks among the quickest Python frameworks currently available. This performance is crucial for handling high loads and ensuring responsive APIs.
Ease of Use:
- FastAPI’s syntax is simple and intuitive, making it easy to learn and use. It leverages Python type hints, which improves code readability and reduces bugs.
Automatic Documentation:
- FastAPI effortlessly creates interactive API documentation with the help of Swagger UI and ReDoc. This feature is invaluable for testing and understanding API endpoints.
Asynchronous Support:
- FastAPI supports asynchronous programming, allowing for non-blocking code execution. This is particularly beneficial for I/O-bound operations, enhancing the overall performance of the API.
Type Safety and Validation:
- Using Pydantic for data validation and serialization ensures that the data passed to and from the API is correct and well-formed, reducing runtime errors.
What is Uvicorn and its benefits for building cloud machine learning APIs?
Uvicorn is a high-performance ASGI server used to run asynchronous web applications in Python. It’s designed to serve frameworks like FastAPI and Starlette, providing fast and efficient handling of HTTP requests. Uvicorn has some benefits:
High Performance:
- Uvicorn is a lightning-fast ASGI server, designed to serve asynchronous web applications. Its performance is on par with other high-performance servers like Node.js and Go.
Compatibility:
- Uvicorn is fully compatible with FastAPI, making it an ideal choice for serving FastAPI applications. It supports HTTP/2 and WebSockets, providing a robust foundation for modern web applications.
Simplicity:
- Uvicorn is easy to set up and use, with a straightforward command-line interface. This simplicity reduces the overhead of configuring and managing the server.
Use Google Cloud Platforms to deploy ML model as API
Security:
- GCP offers advanced security features, including identity and access management, encryption, and compliance with industry standards, ensuring your application and data are secure.
Cost-Effectiveness:
- GCP’s pricing model is flexible and competitive, with options for pay-as-you-go and sustained use discounts. This makes it a cost-effective choice for deploying and scaling applications.
Developer Tools:
- GCP provides a suite of developer tools, including Cloud Shell, Cloud Build, and Cloud Source Repositories, which streamline the development and deployment process. In this article below we will deploy ML model as API using the Cloud Shell tool.
Creating docker-file
Cloud Shell is a web-based embeddable functionality at Google Cloud Platform that you can access from any browser. It features an online terminal equipped with tools like the docker, gcloud command-line tool, kubectl, and other utilities for managing your resources. For this purpose, it’s necessary to create a docker file. Where each part of it will be explained in detail below:
- Use a lightweight version of Python 3.9 as the base image:
FROM python:3.9-slim
2. Set environment variables to prevent Python from writing .pyc files and to ensure unbuffered output:
ENV PYTHONDONTWRITEBYTECODE=1
ENV PYTHONUNBUFFERED=1
3. Upgrade pip and install necessary Python libraries, including TensorFlow, OpenCV, FastAPI, Uvicorn, and others:
RUN pip install --upgrade pip
RUN pip install tensorflow==2.12 opencv-python fastapi==0.110.0 uvicorn==0.22.0
RUN pip install efficientnet --no-dependencies
RUN pip install scikit-image --no-dependencies
RUN pip install lazy_loader --no-dependencies
RUN pip install keras_applications --no-dependencies
RUN pip install click
RUN pip install opencv-python-headless
RUN pip install python-multipart
4. Set the working directory inside the container to /app and copies the app.py file and folds directory from your local machine to the container:
WORKDIR /app
COPY app.py /app
COPY folds /app/folds
RUN apt-get update
RUN apt install -y libgl1-mesa-glx
5. Update the package lists and installs the libgl1-mesa-glx package for OpenCV and expose port 8080 and specifies the command to run the FastAPI application using Uvicorn:
EXPOSE 8080
CMD ["uvicorn", "app:app", "--host", "0.0.0.0", "--port", "8080"]
Deploying machine learning cloud API on the Google Cloud Platform
By following these steps, it’s possible to successfully deploy your Docker image on GCP and create cloud machine learning API service using Cloud Shell:
Step 1: Set Up Google Cloud Platform
- Create a GCP Account: If you don’t have one, create a Google Cloud Platform account.
- Create a Project: Go to the GCP Console and create a new project.
Step 2: Open Cloud Shell
- Access Cloud Shell: Click on the Cloud Shell icon in the top-right corner of the GCP Console. This opens a terminal directly in your
Step 3: Authenticate
- Cloud Shell will automatically authenticate you as a current user of GCP (this step just for your information).
Step 4: Build and Push Docker Image
- Navigate to your Project Directory: Use the cd command to navigate to the directory containing your
- Build the Docker Image: Run the following command to build your Docker image and replace PROJECT-ID with your GCP project ID, IMAGE-NAME with your desired image name, and TAG with the version tag (e.g., v1).:
gcloud builds submit --tag gcr.io/PROJECT-ID/IMAGE-NAME:TAG .
Step 5: Deploy to Google Cloud Run
Deploy the Image: Run the following command to deploy your Docker image to Google Cloud Run and replace PROJECT-ID, IMAGE-NAME, SERVICE-NAME with your desired names:
gcloud run deploy SERVICE-NAME --image gcr.io/PROJECT-ID/IMAGE-NAME:TAG --platform managed
- Configure Deployment Settings: Follow the prompts to configure your deployment settings, such as region and authentication.
Step 6: Final results
After finishing the job for deploying a service on the cloud, the user gives the final path for using. In our case this path:
Please enter numeric choice or text value (must exactly match list item): 14

To make this the default region, run `gcloud config set run/region europe-north1`.

Allow unauthenticated invocations to [fastapi-app] (y/N)? y

Deploying container to Cloud Run service [fastapi-app] in project [nifty-realm-430309-n7] region [europe-north1]...
OK Deploying new service... Done.
  OK Creating Revision...
  OK Routing traffic...
  OK Setting IAM Policy...
Done.

Service [fastapi-app], revision [fastapi-app-00001-xhn] has been deployed and is serving 100 percent of traffic.
Service URL: https://fastapi-app-zs1l6bqkqa-oa.a.run.app
As we can see, service is available by URL.
Testing
After finishing the deployment, let’s visit the generated service by providing the URL from the previous step. FastAPI has a built-in integration with Swagger, which is a powerful tool for API documentation. Swagger provides an ability to test API endpoints directly from the documentation interface and helps in quickly identifying and fixing issues during development. The home page is shown in the figure:
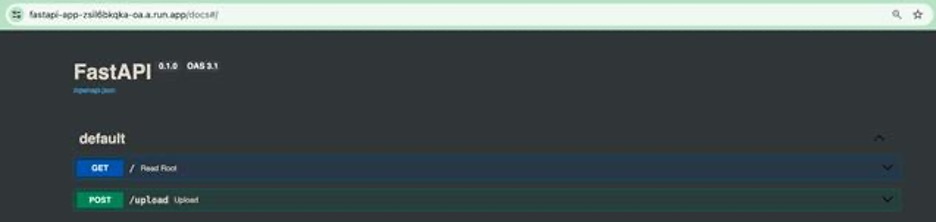
As you can see, there are two APIs. The first is to test robotic ability. The second is just for determining the disease. To check, upload an image of the fundus. Well, let’s look at the result of the experiment with 200-status. Which tells us that the image was successfully processed:
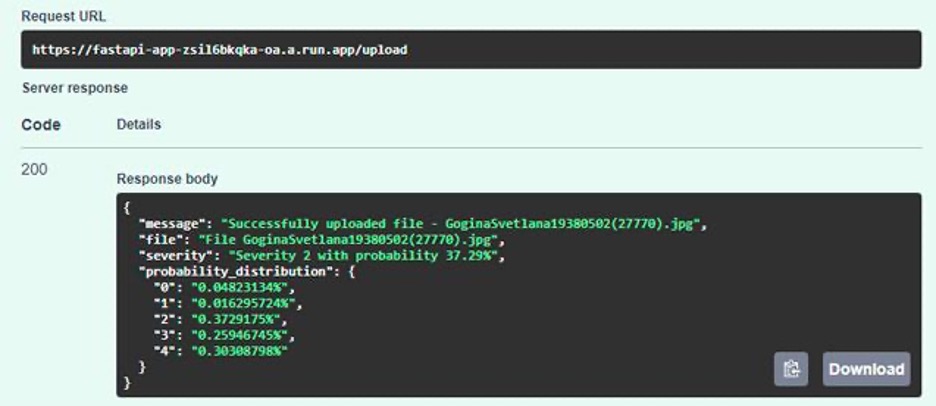
As can be seen from the results of the software, the fourth stage of the retinopathy was confirmed:
{
  "message": "Successfully uploaded file - Elena Genadjvna10.01.11.jpg",
  "file": "File Elena Genadjvna10.01.11.jpg",
  "severity": "Severity 4 with probability 53.15%",
  "probability_distribution": {
    "0": "0.057859645%",
    "1": "0.018798877%",
    "2": "0.25461438%",
    "3": "0.13719666%",
    "4": "0.531530445%"
  }
}
Conclusion
In this article, we explored the process of delivering a machine learning (ML) model into a robust API service and deploying it in the cloud. We started by setting up the development environment and building the ML model. Using FastAPI, we created a high-performance, easy-to-use API to serve the model. We then containerized the application with Docker, ensuring consistency and portability across different environments. Next, we deployed the Docker image to Google Cloud Platform (GCP), leveraging its scalability, security, and global reach. We also tested the deployed service to ensure it operates efficiently.
By understanding and applying the concepts discussed, readers can enhance their technical skills and make their ML models accessible to a broader audience.
In conclusion, wrapping a machine learning model in an API and deploying it in the cloud represents a significant advancement in the accessibility and scalability of machine learning applications. By leveraging a machine learning cloud API, organizations can streamline their workflow, enabling seamless integration and real-time predictions.
Furthermore, the implementation of a cloud machine learning API not only enhances performance but also optimizes resource utilization, allowing businesses to focus on innovation rather than infrastructure management. As the demand for intelligent solutions continues to rise, adopting a machine learning cloud API will be crucial for staying competitive in the rapidly evolving tech landscape. By understanding and applying the concepts discussed, you can enhance their technical skills and make their ML models accessible to a broader audience through a cloud machine learning API.
