Amazon Web Services (AWS) stands out as a leading cloud platform offering a wide range of services to support application development and deployment.
Spring Boot, on the other hand, is a popular framework for the rapid development of Java-based applications. Combining the power of Spring Boot with AWS services can significantly improve the scalability, reliability, and performance of your applications.
This article explores the significance of such integration and highlights the benefits it brings to businesses, drawing insights from Amazon Web Services (AWS) and their perspective on accelerating cloud-based application delivery.
Getting started with Spring Boot and AWS
Before we dive into the technical details, let’s outline the basic steps required to develop a Spring Boot application with AWS integration:
- Set up an AWS account. If you haven’t already, register for an AWS account and receive an AWS Access Key ID and Secret Access Key.
- Configure AWS Credentials: Make sure your AWS credentials are configured correctly in your local development environment. This can be done using the AWS Command Line Interface (CLI) or by setting environment variables.
- Choose AWS Services: Identify the AWS services that you will integrate with your Spring Boot application. Common services include Amazon S3 for object storage, Amazon RDS for relational databases, and Amazon DynamoDB for NoSQL databases.
- Integrate AWS SDK: Include the AWS SDK for Java in your Spring Boot project to interact with AWS services.
- Develop Spring Boot Application: Build your Spring Boot application, including the necessary dependencies and configurations for AWS integration.
- Test Locally: Make sure your application works as expected in your local development environment before deploying it to AWS.
- Deploy to AWS: Deploy your Spring Boot application to AWS, leveraging services like AWS Elastic Beanstalk, AWS Lambda, or Amazon ECS for container deployment.
- AWS Elastic Beanstalk: A fully managed service for deploying and scaling web applications.
- AWS Lambda: A serverless computing service that runs your code in response to events.
- Amazon ECS: A container management service that allows you to easily run and scale containerized applications.
Choose the deployment option that best suits your needs and follow the appropriate deployment instructions provided by AWS.
The Example of Implementation
To illustrate the process of developing a Spring Boot application with AWS integration, let’s look at an example scenario: building a RESTful API to manage a collection of products stored in Amazon DynamoDB. For this we will use AWS SDK for Java and Spring Data DynamoDB.
Step 1: Set Up Your Development Environment
Ensure that you have Java JDK, Maven, and your preferred IDE installed on your development machine. Additionally, make sure that you have an AWS account set up with the necessary permissions to access DynamoDB.
Step 2: Create a New Spring Boot Project
Start by creating a new Spring Boot project using the Spring Initializr or your IDE’s project creation wizard. Include the necessary dependencies for web, AWS SDK, and Spring Data DynamoDB.
Step 3: Configure AWS Credentials
Configure your AWS credentials either by setting environment variables (`AWS_ACCESS_KEY_ID` and `AWS_SECRET_ACCESS_KEY`) or by using the AWS CLI’s `aws configure` command.
Step 4: Define Entity Classes
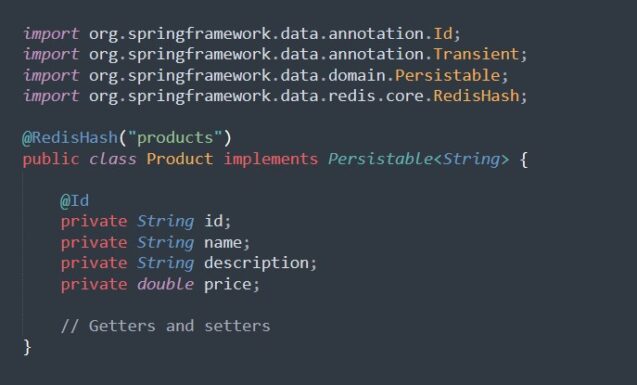
Create Java entity classes to represent your domain objects. For example, you might create a `Product` class with attributes such as `id`, `name`, `description`, and `price`.
Step 5: Implement Repository Interface
Define a repository interface that extends `CrudRepository` or `DynamoDBCrudRepository` to perform CRUD operations on your entity.
Step 6: Create REST Controller
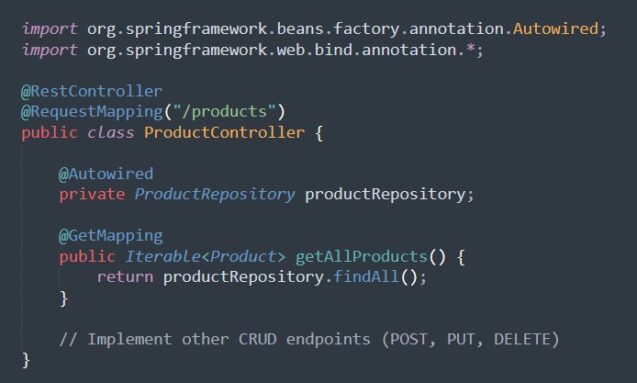
Develop a REST controller to handle HTTP requests for CRUD operations on your `Product` entity.
Step 7: Test Locally
Run your Spring Boot application locally and test the API endpoints with tools like Postman or Curl to ensure everything works as expected.
Step 8: Deploy to AWS
Once you’ve verified that your application works locally, deploy it to AWS using your preferred deployment method, such as AWS Elastic Beanstalk or AWS Lambda.
The Importance of Building Applications that Seamlessly Integrate with Cloud Services
Building applications that seamlessly integrate with cloud services accelerate the time-to-market for businesses, giving them a competitive advantage in today’s fast-paced digital economy. Cloud-based development environments provide developers with the tools and resources they need to iterate quickly, experiment with new features, and respond rapidly to customer feedback.
By harnessing the scalability and agility of cloud services, organizations can innovate more effectively, bringing new products and services to market faster than ever before. This agility is particularly crucial in industries where speed and innovation are paramount, such as fintech, e-commerce, and digital media.
Furthermore, cloud services often incorporate advanced technologies such as content delivery networks (CDNs), edge computing, and auto-scaling capabilities, which enhance application performance and resilience. By distributing content closer to end-users and optimizing network routes, organizations can deliver faster response times and a seamless user experience, regardless of geographic location or device type.
Benefits of Spring Boot and AWS Integration
By combining Spring Boot with AWS, developers can enjoy several benefits:
- Rapid Development: Spring Boot’s convention-over-configuration approach allows developers to quickly build and iterate on their applications.
- Scalability: AWS provides automatic scaling capabilities that allow applications to handle increased traffic and demand without manual intervention.
- Reliability: AWS offers high availability and fault tolerance, ensuring that applications remain accessible and performant.
- Security: AWS provides robust security features, including encryption, access control, and compliance certifications, to protect sensitive data and applications.
More complex integration
Let’s dive into the code examples for developing a Spring Boot application with AWS integration. We’ll look at more complex scenarios such as interacting with AWS S3 for file storage, AWS Lambda for serverless computing, and AWS DynamoDB for NoSQL database operations.
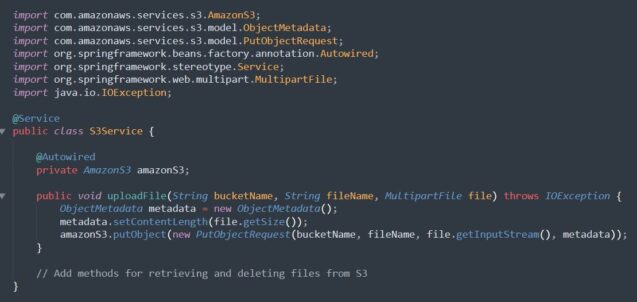
Interacting with AWS S3 for File Storage
In this example, we’ll demonstrate how to upload files to AWS S3 from a Spring Boot application and retrieve them later.
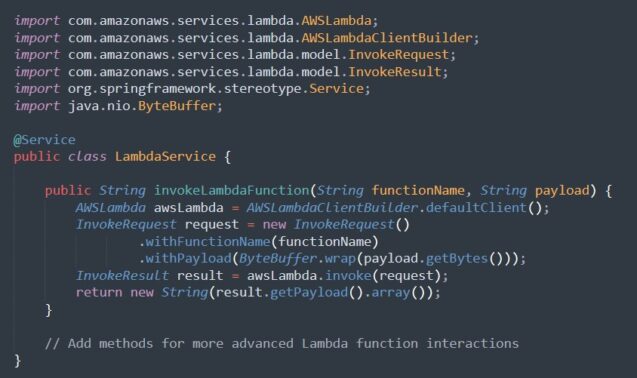
Invoking AWS Lambda Functions from Spring Boot
In this example, we’ll show how to invoke an AWS Lambda function from a Spring Boot application using the AWS Lambda Java SDK.
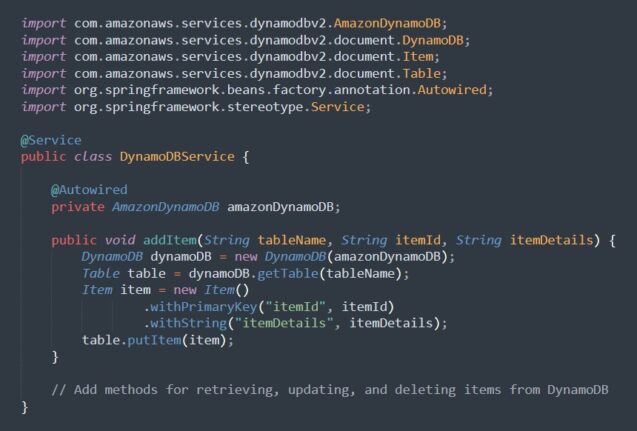
Integrating with AWS DynamoDB for Database Operations
In this example, we will show how to perform CRUD operations on an AWS DynamoDB table from a Spring Boot application.
These examples demonstrate more complex interactions with AWS services within a Spring Boot application. By integrating with AWS S3 for file storage, AWS Lambda for serverless computing, and AWS DynamoDB for database operations, developers can leverage the scalability, reliability, and flexibility of AWS while benefiting from the rapid development capabilities of Spring Boot.
With careful design and implementation, these integrations can empower developers to build robust and efficient cloud-native applications that meet the demands of modern business environments.
Conclusion
Developing a Spring Boot application with AWS integration enables you to leverage the power and scalability of cloud services while benefiting from the rapid development capabilities of the Spring Boot framework. By following best practices and leveraging tools such as the AWS SDK for Java and Spring Data DynamoDB, you can build robust and scalable applications that meet the demands of modern cloud-based environments.
Experiment with different AWS services and explore how they can enhance your Spring Boot applications to deliver superior performance and reliability.


